 |
DESIGNING AND BUILDING A HOME STUDIO:
|
|---|
At one time or another, all drummers are faced with the laborious task of locating a place to practice. Finding a suitable place to practice drumset can often be a very frustrating experience. Let's face it, acoustic drums are probably the loudest of all musical instruments, and everyone else in the world doesn't always share our same affection for the beautiful sound of acoustic drums. In a crowded suburban environment where many of us live, the location of a suitable practice facility in which sound from the drums doesn't bother family members or neighbors can be a difficult if not impossible job. I'm sure that the noise problem associated with practice is also a common problem for many other drummers. If you're like me, once you got interested in playing drums you probably wanted to practice and play all the time. That creates a problem for loved ones and people living nearby, unless you happen to live on a deserted island somewhere.
It has been my long time dream to build a home studio in which I can practice my drums without the worry of complaining neighbors or outside distractions. Previously, I have experimented in building practice studios to help solve the noise problem of playing drums, but with only limited success. My first homemade studio was a conversion of an unused bedroom into a drum studio by using several layers of cardboard and egg cartons stapled and glued onto the walls. Located in a very old house, this studio had no air conditioning or heating, and no external treatment was applied to the floor or ceiling for noise reduction. The studio was, at best, only semi-effective in containing the sound of my drums. Luckily, the police were never called on me for practicing at that house. Several years and many houses latter, my wife and I purchased a home in a Dallas suburb with the intent of eventually converting the garage into a studio. As we shopped around for different houses, I carefully checked out floor designs in order to select a home that would be conducive to building a studio in the garage. We finally found the right place, and after living there for about a year, I was ready to begin building a studio.
This three part series of articles explains the long and sometimes painful odyssey that I went through over the last two years in designing and building my own state-of-the-art home studio. In these articles I will explain: the search for someone to help me design a studio; my association with architects, sound engineers, contractors, construction workers, city employees, etc. which helped me design and build my studio; how we got the studio to be acoustically effective in containing the sound of my drums; the construction process of the studio; and how you can design and build a similar studio suited to your needs. I hope that this series of articles helps to educate others as to what building a studio actually entails. I also hope these articles help others obtain a studio as nice as mine with fewer problems encountered along the way.
First of all, I am a musician not a craftsman. I have a lot of trouble sawing a board correctly. The scope of these articles will be more from a drummer's viewpoint. I did not actually build the studio myself, I had it built by other people for me. I have very little knowledge about the construction process. This series of articles will not be: "How To Get Out Your Own Boards and Nails and Construct a Soundproof Music Studio In Your Home". Instead, it will be aimed more toward how an ordinary musician like me or you can work with skilled and knowledgeable people to design and build a very professional studio that is suitable to your needs.
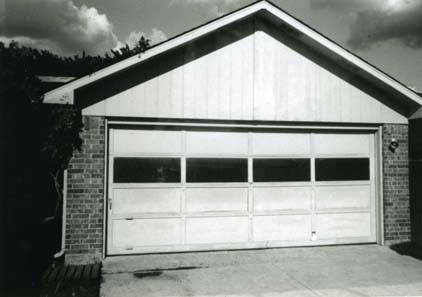
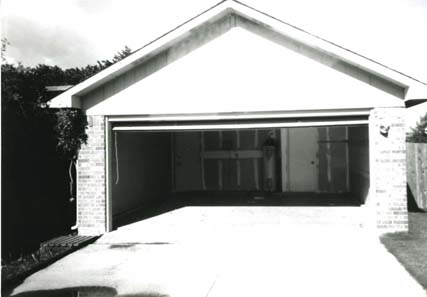
My studio is located where the garage used to be in our house. The garage was built for two cars and the dimensions measure 20' x 18 1/2' x 8'. It is approximately 400 square feet. The garage is located on the back side of the house and there is a 50 foot driveway which connects it and the alley behind the house. Our house is located in a suburban neighborhood of many houses which are spaced approximately 19 feet from each other. There are neighbors living on both sides of our house.
 |
 |
|---|
Before
The first two years that my wife and I lived in this house, I used both the dining room and a bedroom to practice and keep my drums and instruments. However, in almost every room of the house and all through the attic, I stored equipment, music, books, etc. I decided that I wanted a nice facility in which I could pursue my musical interests right here in my home but a little more removed from the rest of the living areas inside the house. The only way to get that facility was to build a home studio in the garage. I decided that it would be best to have someone else design and build the studio for me due to my limitations as a handyman mentioned above. After about a year and half of time and about $25,000 of my money, I now have a truly remarkable home studio that I'm extremely proud of and I plan on using for probably the rest of my life.
 |
 |
|---|
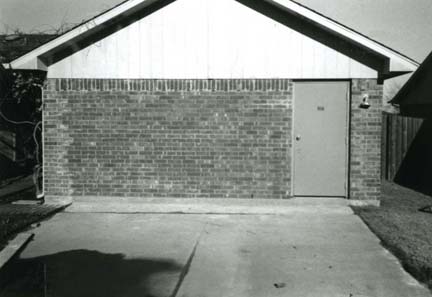
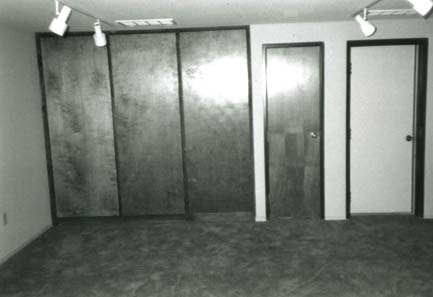
After
When I first set out to have my home studio built, I came up with some guidelines of what I wanted from the studio and what it would actually be used for. I was hoping that a specifically written out set of guidelines would be of some help to the person who would build my studio. The list that I came up with was indeed very helpful for those who eventually worked with me in building my studio. Here is a list of those guidelines with some of my reasoning in parenthesis.
GUIDELINES FOR MUSIC STUDIO CONSTRUCTION
Install sound insulating room inside existing garage to be used as a music studio designed for:
1. Music practice (drumset, assorted percussion instruments,
electronic keyboards, other electronic percussion instruments)
2. Teaching private percussion lessons
3. Recording studio
4. Small ensemble rehearsal facility
Current measurements of garage: 20 feet long, 18 1/2 feet wide, 8 feet tall
Approximately 400 square feet
Design walls and ceiling from an acoustical perspective so that maximum sound frequencies will be contained inside room and not disturb family members in the adjoining house, persons outside, or in nearby houses. (Initially I was specifying, ideally, a "soundproof" room. What I didn't realize at that time was that there is no such a thing as a truly soundproof room.)
Design studio so that inside acoustics will be fairly dead sounding.
(I desired more of a muffled sound inside the room as opposed to a loud boomy room with a lot of ring. If I desire more ambience than the room offers, it can be accomplished by using different miking techniques and digital reverb.)
Build over current walkway door in garage which leads to porch area.
(Take away this door because it would no longer be needed.)
Install separate air conditioning/heating unit for the studio. Use silencers, filters, etc., so that incoming/return air ducts do not leak sound out of studio. Incoming air should be silenced enough to enable activities such as recording, without ventilation noise. (The vents in our house had been a major problem for me when practicing. Persons in other rooms of the house could clearly hear the drums because of sound traveling through the vents. I learned that it would be necessary to install a separate ventilation system of heating and cooling for the studio, apart from the house system. I also wanted a ventilation system which would be quiet, unlike many studios and practice facilities I have been in where the ventilation is noisy.)
Install track lighting such that room will be adequately lighted for reading music and other detailed work, and also in a manner that will be silent (i.e.- no fluorescent hum, etc.) for recording applications. (I wanted to avoid lights that hummed and caused electrical noise in conjunction of use with electronic instruments.)
Install two sets of acoustical sound doors: One door going into house at utility room; One door going outside to driveway.
Doors should be lockable.
Doors should be able to accept a wireless port which incorporates into the home security system.
Door leading outside should be big enough to get a 32 inch timpano through.
Doors should have appropriate acoustical seals in order to contain as much sound as possible inside the studio.
(The doors ended up being a major hassle. Commercial practice room doors start at a minimum of $1,500, and even then aren't good enough for containing all of sound that a trap set produces. More on the doors later.)
Inside wall on driveway side should be able to accept a wireless motion detector which incorporates into the home security system.
Install several sets of duplex (grounded) electrical outlets along each wall.
Outlets should be installed to be used with electronic musical instruments which are sensitive to electric current fluctuations and noise caused by: refrigerators, air conditioning, household appliances, lighting, local radio and TV frequencies, etc.
(I wanted to have plenty of electrical outlets. It seems like there is never enough outlets for electronic instruments. It is also important to make sure that the outlets are not on the same circuit as refrigerators and other appliances which periodically turn on and off and introduce noise into critical musical work such as recording.)
Install telephone outlet, cable TV outlet, thermostat control panel, and lighting switch. (I made up a diagram of the studio showing where I wanted each outlet, telephone connection, etc. for the electrician. That made his job a lot easier.)
Build sound wall around existing hot water heater and acoustically treat pipe inserts into the wall so that sound will not leak through.
(The water heater for our house is located in the garage and there is no other logical place to locate it. So, we had to figure a way to build around it. The challenge came in building around it to prevent sound from entering the house where the pipes go into the wall.)
Install custom shelves (after sound walls are installed) on water heater side of studio with moveable shelves and swinging doors.
(This is so I would have a place to store my cases, mallets, various instruments, and an assortment of other musical things, so that they would be concealed from view inside the studio. The shelves also serve as an additional acoustical treatment to the wall because they are located against the wall which connects to the rest of the house.)
Building a studio in the house or garage technically comes under the heading of "remodeling". I once heard a saying about home remodeling. It went something like: "When you remodel, you'll find that it takes longer than you thought it would, it costs more than you thought it would, and it's harder than you thought it would be". I thought: "Now, that's a cute little saying but it surely won't apply to me when I put in my own studio". Little did I know, I was in for a big surprise during the next several months...make that many big surprises!
I figured that in order to have a studio built, all I would have to do was call up somebody and have them come over and start converting my existing garage. It all seemed really simple at first. I had originally intended to spend from $2,000 to $5,000 to have my studio built, and I expected to be in it jamming in only a few weeks. Again, a harsh reality awaited me. What I learned over the next months really enlightened me a lot about people, construction, acoustics, and life.
The first step I took towards actually having my studio built was to contact an uncle who had expressed an interest in helping me. After several failed attempts at coming over to look at the garage, it soon became apparent that he didn't have the time to help me build a studio, but he attempted to explain over the phone how to do it myself. His instructions consisted of building a separate room inside the existing garage with insulation between the walls and then bricking over where the existing garage door stands. The thought of laying bricks and trying to construct walls that were straight and would stand up without leaning or falling down horrified me! I worried over that for a few weeks and decided to start all over again.
At that time, I was teaching a percussion student whose father runs a very nice local recording studio. After talking to the father on the phone, he agreed to help me and also mentioned that he had just helped another guy put in a great home studio in his garage. However, next week the student moved away and I never heard from her or her father again. I worried over that for awhile and decided to once again start all over.
Next, I contacted a company which manufactures a well known brand of prefabricated practice rooms found in the music facilities of many schools. These practice rooms are brought in and set up very easily and are both good looking and functional. They are available in many sizes, the most popular which measures about 6' x 6'. Although extremely small, that size is just about big enough to get a modest size trap set into. However, this small size room wouldn't work too well for teaching, recording and practicing assorted percussion and electronic instruments which is what I do. So, I thought "Why not contact these people and find out how much they would charge to build a practice room the size of my garage ( 20' x 18 1/2' x 8') and install it for me?" I contacted them and asked about the possibility of purchasing a custom built practice room tailored to the dimensions of my garage. They told me that they had never done such a thing before and, if I wanted to have one of their practice rooms I would have to pick out one of their larger practice rooms that was closest to the size of my garage. I wasn't too thrilled about having a large, not-quite-the-right-size practice room sitting inside my garage, but I decided to investigate further (in other words, how much does it cost?). These people agreed to come out to my house and install their prefabricated practice room, with no carpet and no ventilation system of any kind, for a mere $23,000. Discouraged but determined not to give up, I once again decided to start all over again.
A few weeks latter I was inside a nearby high school with brand new bandhall facilities. These were undoubtedly some of the best constructed and most beautiful music facilities that I had ever seen. I thought, "Why not call the architect who designed these facilities and have him come over and design my studio?" I got the name of the architect firm, which turned out to be one of the giant architectural firms in Dallas, and confidently called them on the phone and explained myself.
What I realize now is, calls like mine, wanting a giant corporation to come over and convert a garage are probably what guys like this laugh about at their parties. Big architectural firms usually design very large scale projects beginning in the million dollar and upwards price range, and they don't have any time or desire to do a little project like building a garage studio for me. By this time I was getting pretty discouraged over the whole thing and just about decided to give up. It didn't seem to matter quite so much anymore that most of our house and attic was cluttered with percussion instruments, and the neighbors were able to tell me in detail what I had been practicing yesterday. The dream of having my own home studio was rapidly slipping away.
A few weeks later I was contacted on the phone by an architectural designer who worked for the giant Dallas architect firm which had built the great bandhall facilities, wanting to help me design and build my studio. I didn't know anything about this person or any qualifications. I was so happy though to have someone willing to work with me, their qualifications didn't seem to matter. I was told that the job I wanted done could be accomplished from planning to completed stages in about two months for a cost of around $10,000. (Initially, remember I had intended to spend between $2,000 - $5,000 to build my studio.) Although I wasn't really excited with having to come up with more than double the money I had originally intended to spend, I decided that in the long run it would be money well spent, so I agreed to go on with the project. I was excited to have things moving again.
I started having meetings with this designer and set out to plan and build my studio. My big mistake here though was, first working with a person that I didn't really know anything about, and second, using someone who lacked the necessary skill and expertise from an acoustical standpoint, and third, trusting my studio with someone again who didn't have the time to devote to the project. To make a long story short, after five months of waiting around for the plans to be be complete and with no construction anywhere in sight, this person decided to bail out and resigned from the project. I was back at square one again and extremely disappointed.
If this story has a hero, (and there was never a time where I needed a hero worse than now) this is where he comes into the picture. During the previous five months of working with the designer, I had been in touch with the father of another of my students, who is an architect. His name is Ron Hobbs. Ron is the head of a small but rapidly growing architectural firm in Dallas. Ron had been content to act as a consultant/advisor on the side while I worked with this other designer in building the studio. During the last five months, I had been in contact with him several times asking questions about the design and why things were taking so long working with this other person. Ron always was willing to give an opinion or advice whenever I asked, but he was careful not to criticize anything the designer had done. Also, surprisingly enough, Ron didn't seem bitter that I hadn't come to him in the first place to design my studio (which is what I wish I had done now).
Ron was aware of the problems that I was having with the designer all along, and I immediately called him after receiving the designer's resignation and practically begged him to take over the project and oversee its' completion. He gladly agreed and Ron and I were able to work together for many months and finally get the studio built. So, ten months after originally setting out to build a studio, I finally found the person who was actually going to help me build it!
I spent almost a year of my life running into dead ends trying to locate a person or company which could or would help me build my studio. The story eventually has a happy ending though and I did get my studio built (as you will see in future articles). What I learned from all of this is: 1) You can't trust everyone. 2) Even though a lot of people mean well, it takes a special kind of person to design a home studio. 3) Make sure to select people who are professional and qualified. and 4) Beware of pinheads and weasels.
In next month's article I'll explain starting all over again (for the last time) with Ron Hobbs and also how we worked together with a whole team of people who had expertise in specialized areas necessary to build my home studio.